Recyclerview Android in the advanced version of the listview. Recyclerview simplifies the display and handle of a large set of data. It’s coming with default animations. Recyclerview provides layout managers for positioning items.
Recyclerview’s Official document says,
If your app needs to display a scrolling list of elements based on large data sets (or data that frequently changes), you should use RecyclerView as described on this page.
Advantages of Android Recyclerview
1. ViewHolder Pattern
In a ListView, it was recommended to use the ViewHolder pattern but it was never a compulsion. In the case of RecyclerView, this is mandatory to use the RecyclerView.ViewHolder class. This is one of the major differences between ListView and RecyclerView.
It makes things a bit more complex in RecyclerView but a lot of problems that we faced in the ListView are solved efficiently.
2. LayoutManager
This is another massive enhancement brought to RecyclerView. In a ListView, the only type of view available is the vertical ListView. There is no official way to even implement a horizontal ListView.
Now using a RecyclerView, we can have a
- LinearLayoutManager — which supports both vertical and horizontal lists,
- StaggeredLayoutManager — which supports Pinterest-like staggered lists,
- GridLayoutManager — which supports displaying grids as seen in Gallery apps.
And the best thing is that we can do all these dynamically as we want.
3. Item Animator
ListViews are lacking in support of good animations, but the RecyclerView brings a whole new dimension to it. Using the RecyclerView.ItemAnimator class, animating the views becomes so much easy and more intuitive.
4. Item Decoration
In the case of ListViews, dynamically decorating items like adding borders or dividers was never easy. But in the case of RecyclerView, the RecyclerView.ItemDecoratorclass gives huge control to the developers but makes things a bit more time-consuming and complex.
5.RecyclerView.Adapter
RecyclerView includes a new kind of adapter. It’s a similar approach to the ones you already used, but with some peculiarities, such as a required ViewHolder. You will have to override two main methods: one to inflate the view and its view holder , and another one to bind data to the view. The
good thing about this is that the first method is called only when we really need to create a new view. No need to check if it’s being recycled.
Also, I have added another post on adding pagination for the recyclerview.
Pagination with Paging 3 in Android Example – Howtodoandroid
Done with the explanation. Let’s create a sample application with recyclerview android.
1. Recyclerview Android Dependency
For using RecyclerView in your project you need to add the recycler view support library to your project. Add the following gradle dependency to the project build.gradle file.
dependencies {
    implementation "androidx.recyclerview:recyclerview:1.2.1"
    }
2. Create a layout with Recyclerview
Add android Recyclerview into activity_main.xml
<?xml version="1.0" encoding="utf-8"?>
    <RelativeLayout xmlns:android="http://schemas.android.com/apk/res/android"
        xmlns:tools="http://schemas.android.com/tools"
        android:layout_width="match_parent"
        android:layout_height="match_parent"
        xmlns:app="http://schemas.android.com/apk/res-auto"
        tools:context=".MainActivity">

        <androidx.recyclerview.widget.RecyclerView
            android:id="@+id/recycleView"
            android:layout_width="match_parent"
            android:layout_height="match_parent"
            android:padding="8dp"
            app:layoutManager="androidx.recyclerview.widget.LinearLayoutManager"
            tools:listitem="@layout/item_row"/>
    </RelativeLayout>
3. Create Data Model
Create a Model class to hold the data for the recyclerview. In my case, I am using Items.kt model class.
data class Items internal constructor(var name: String, var price: Int)4. Prepare an Adapter for the Recyclerview
A Recylerview adapter is used to hold the view with data. For that, we need to design the layout resource file item_row.xml first.
<?xml version="1.0" encoding="utf-8"?>
    <androidx.cardview.widget.CardView xmlns:android="http://schemas.android.com/apk/res/android"
        xmlns:tools="http://schemas.android.com/tools"
        xmlns:app="http://schemas.android.com/apk/res-auto"
        android:orientation="vertical"
        android:layout_width="match_parent"
        android:layout_height="wrap_content"
        android:id="@+id/itemLayout"
        android:layout_margin="8dp"
        android:elevation="4dp"
        app:cardCornerRadius="8dp"
        android:backgroundTint="#DADADA">

        <androidx.appcompat.widget.LinearLayoutCompat
            android:layout_width="match_parent"
            android:layout_height="wrap_content"
            android:orientation="vertical"
            android:padding="8dp">
            <TextView
                android:layout_width="match_parent"
                android:layout_height="wrap_content"
                android:textAppearance="?android:attr/textAppearanceMedium"
                android:id="@+id/tvName"
                tools:text="@tools:sample/full_names"
                android:padding="5dp"
                android:textStyle="bold"
                android:textColor="#121212"/>

            <TextView
                android:layout_width="match_parent"
                android:layout_height="wrap_content"
                tools:text="@tools:sample/full_names"
                android:padding="5dp"
                android:textColor="#121212"
                android:textAppearance="?android:attr/textAppearanceSmall"
                android:id="@+id/tvPrice" />

        </androidx.appcompat.widget.LinearLayoutCompat>

    </androidx.cardview.widget.CardView>
In this example, I have used cardview for the item design. You can learn more about cardview at the below link.
Cardview with Recyclerview Android Example [beginners] (howtodoandroid.com)
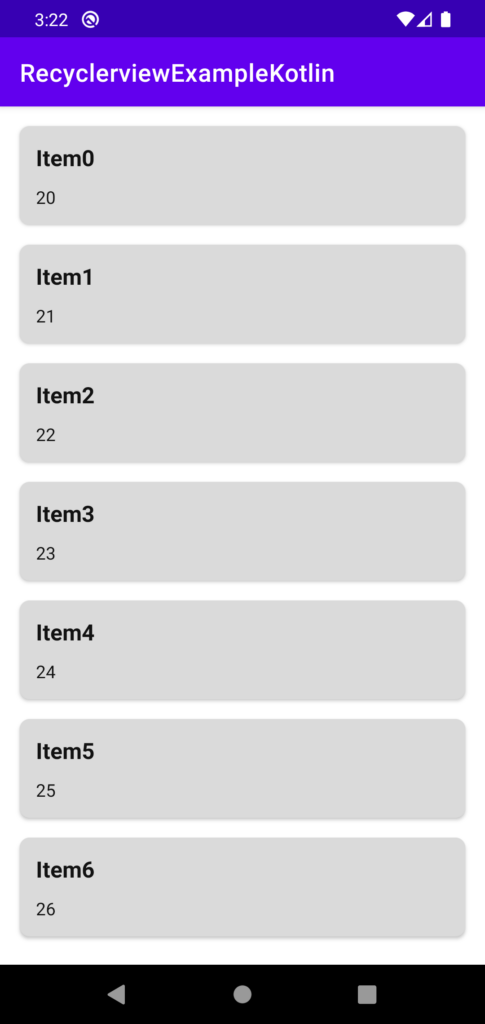
The design will be looks like this,

The UI for the recyclerview adapter is ready. next, create the adapter for the recyclerview. The Recyclerview adapter should extend the RecyclerView.Adapter<ViewHolder>.
Also, Recyclerview needed ViewHolder to hold the view items.
RecyclerviewItemAdapter.java
class RecyclerviewItemAdapter internal constructor(private val itemsList: List<Items>) :
        RecyclerView.Adapter<MyViewHolder>() {
        private var clickListener: ClickListener<Items>? = null
        override fun onCreateViewHolder(parent: ViewGroup, viewType: Int): MyViewHolder {
            val view = LayoutInflater.from(parent.context).inflate(R.layout.item_row, parent, false)
            return MyViewHolder(view)
        }

        override fun onBindViewHolder(holder: MyViewHolder, position: Int) {
            val item = itemsList[position]
            holder.name.text = item.name
            holder.price.text = item.price.toString()
            holder.itemLayout.setOnClickListener { v -> clickListener!!.onClick(v, item, position) }
        }

        override fun getItemCount(): Int {
            return itemsList.size
        }

        fun setOnItemClickListener(clickListener: ClickListener<Items>) {
            this.clickListener = clickListener
        }

        inner class MyViewHolder(itemView: View) : ViewHolder(itemView) {
            var name: TextView = itemView.findViewById(R.id.tvName)
            var price: TextView = itemView.findViewById(R.id.tvPrice)
            val itemLayout: CardView = itemView.findViewById(R.id.itemLayout)

        }
    }
5. Prepare data for recyclerview
Once the adapter is created, we need to prepare data for the recyclerview. So that, we can set it into recyclervirew using an adapter. in MainActivity.kt
private fun prepareItems() {
            for (i in 0..49) {
                val items = Items("Item$i", 20 + i)
                itemsList!!.add(items)
            }
        }
In most cases, We use REST API to fetch data from the server. Check the below link for retrofit android with recyclerview.
Retrofit android example kotlin[step by step] – Howtodoandroid
6. Set Recyclerview Adapter to Recyclerview
In the previous, we created an adapter and data for the recyclerview. Now, we need to set it into recyclerview.
recyclerView = findViewById<View>(R.id.recycleView) as RecyclerView
    recyclerviewItemAdapter = RecyclerviewItemAdapter(itemsList)
    recyclerView!!.setHasFixedSize(true)
    val layoutManager: RecyclerView.LayoutManager = LinearLayoutManager(applicationContext)
    recyclerView!!.layoutManager = layoutManager
    recyclerView!!.itemAnimator = DefaultItemAnimator()
    recyclerView!!.adapter = recyclerviewItemAdapter
That’s it. we created the recyclerview with data. Now you can able run this and see the data in the recyclerview.
7. Implementing click listener for recyclerview
To implement a click listener, First, we need to create an interface for the adapter and the recyclerview android.
create ClickListener.kt and add the needed interface.
interface ClickListener<T> {
        fun onClick(view: View?, data: T, position: Int)
    }
In my case, I am having one interface for the recyclerview item click listener.
Next, in your RecyclerviewViewAdapter create a method to get the clickListener instance from your MainActivity.
fun setOnItemClickListener(clickListener: ClickListener<Items>) {
            this.clickListener = clickListener
    }
in MainActivity.java, Call this method with the ClickListener implementation.
recyclerviewItemAdapter!!.setOnItemClickListener(object : ClickListener<Items> {
                override fun onClick(view: View?, data: Items, position: Int) {
                    Toast.makeText(
                        applicationContext, ""Position = $position
     Item = ${data.name}"", Toast.LENGTH_SHORT
                    ).show()
                }
            })
Done. Now we can able to click and get the callback for the recyclerview clicks.
Download the source code for the example on GitHub.
Check out my other post on recyclerview.
Android Recyclerview Search Filter Example
Android Recyclerview Swipe Menu Example
Expandable Recyclerview Android Example [Updated]
Conclusion
Thanks for the reading. In recent times, we are using recyclerview every day. So try to do the sample with the recyclerview and let me know your doubts in the comments.
Leave a Reply