In this Retrofit Android tutorial, I am going to explain how to use the Retrofit REST client to consume the Rest Web services. Basically, Retrofit was developed by square and It’s a type-safe REST client for Android.
In this post, I am explaining code in java. Please check my other post for the Retrofit example in Kotlin.
Retrofit android example kotlin[step by step] – Howtodoandroid
Retrofit official document says,
“A type-safe HTTP client for Android and Java”
Advantages of Android Retrofit
- Retrofit Android is very simple to use. It essentially lets you treat API calls as simple Java method calls, so you only define which URLs to hit and the types of the request/response parameters as Java classes.
- The entire network call + JSON/XML parsing is completely handled by it (with help from Gson for JSON parsing), along with support for arbitrary formats with pluggable serialization/deserialization.
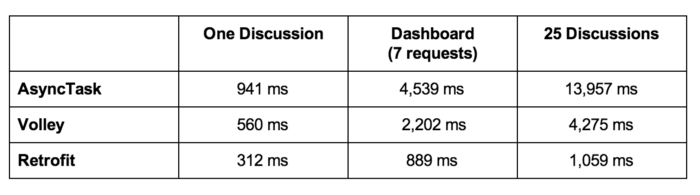
Android Retrofit Speed
Compare with Volley and AsyncTask, Retrofit provides a very fast response to request.
Done with the theory part, Let’s get into the code part.
5 steps to create a retrofit android example
- Add the retrofit dependency
- Creating Model Class
- Create The Retrofit Instance
- Setting Up The Retrofit Interface
- Consume The REST Web Service
- Set Retrofit response data into the Recyclerview
1. Add the retrofit dependency
Firstly, Add Internet Permission to your Application in AndroidManifest.xml,
<uses-permission android:name="android.permission.INTERNET"></uses-permission>Then, We have to add the retrofit dependency into our build.grade file. We can find the latest retrofit version on the official retrofit website. http://square.github.io/retrofit/
implementation 'com.squareup.retrofit2:retrofit:'+rootProject.retrofit_versionAnd the GSON converter from retrofit is used to convert the JSON response from the server.
implementation 'com.squareup.retrofit2:converter-gson:'+rootProject.retrofit_version2. Creating Model Class
Before creating the model, we need to know what type of response we will be receiving.
[
       {
          "id":"1",
          "image":"http://velmm.com/images/bottom_navigationview/coco.jpg",
          "title":"Coco"
       },
       {
          "id":"2",
          "image":"http://velmm.com/images/bottom_navigationview/terminator_2.jpg",
          "title":"Terminator 2: Judgment Day 3D"
       },
       {
          "id":"3",
          "image":"http://velmm.com/images/bottom_navigationview/dunkirk.jpg",
          "title":"Dunkirk"
       },
       {
          "id":"4",
          "image":"http://velmm.com/images/bottom_navigationview/the_salesman.jpg",
          "title":"The Salesman"
       },
       {
          "id":"5",
          "image":"http://velmm.com/images/bottom_navigationview/lion.png",
          "title":"Lion"
       },
       {
          "id":"6",
          "image":"http://velmm.com/images/bottom_navigationview/star_war.jpg",
          "title":"Star Wars: The Last Jedi"
       },
       {
          "id":"7",
          "image":"http://velmm.com/images/bottom_navigationview/thor_ragnarok.jpg",
          "title":"Thor: Ragnarok"
       },
       {
          "id":"8",
          "image":"http://velmm.com/images/bottom_navigationview/blade_runner_2049.jpg",
          "title":"Blade Runner 2049"
       },
       {
          "id":"9",
          "image":"http://velmm.com/images/bottom_navigationview/borg_mcenroe.jpg",
          "title":"Borg McEnroe"
       },
       {
          "id":"10",
          "image":"http://velmm.com/images/bottom_navigationview/wonder.jpg",
          "title":"Wonder"
       }
    ]
In my JSON response, I am having the list of movies with name, year, and director properties. So, My Model class will be like a Movie as class name and name, year, and director are properties.
Movie.java
class Movie {

        @SerializedName("title")
        private String title;

        @SerializedName("image")
        private String imageUrl;

        public Movie(String title, String imageUrl) {
            this.title = title;
            this.imageUrl = imageUrl;
        }

        public String getTitle() {
            return title;
        }

        public void setTitle(String title) {
            this.title = title;
        }

        public String getImageUrl() {
            return imageUrl;
        }

        public void setImageUrl(String imageUrl) {
            this.imageUrl = imageUrl;
        }
    }
@SerializedName is used to map the POJO object into to JSON response properties.
3. Create The Retrofit Instance
We need to create the Retrofit instance to send the network requests. we need to use the Retrofit Builder class and specify the base URL for the service.
ApiClient.java
public class ApiClient {
        public static String BASE_URL = "YOUR_BASE_URL";
        private static Retrofit retrofit;
        public static Retrofit getClient(){
            if(retrofit == null){
                retrofit = new Retrofit.Builder()
                        .baseUrl(BASE_URL)
                        .addConverterFactory(GsonConverterFactory.create())
                        .build();
            }
            return retrofit;
        }
    }
4. Setting Up The Retrofit Interface
Retrofit provides the list of annotations for each HTTP method:
@GET, @POST, @PUT, @DELETE, @PATCH, or @HEAD.
The endpoints are defined inside an interface using retrofit annotations to encode details about the parameters and request method. T return value is always a parameterized Call<T>.
Because the POJO classes are wrapped into a typed Retrofit Call class.
Method Parameters :
@Body — Sends Java objects as the request body.
@Url — use dynamic URLs.
@Query — We can simply add a method parameter with @Query() and a query parameter name, describing the type.
To URL encode a query using the form: @Query(value = auth_token,encoded = true) String auth_token
ApiInterface.java
public interface ApiInterface {

        @GET("volley_array.json")
        Call<List<Movie>> getMovies();
    }
5. Consume The REST Web Service
All the setups are done. Now we are ready to consume the REST web service. In Our MainActivity.Java, First, need to initialize the ApiClient.
ApiInterface apiService = ApiClient.getClient().create(ApiInterface.class);After the initialization, we call the getMovies() interface and implement the CallBacks. As part of the implementation, we need to override the onResponse() and onFailure().
If the request succeeds the callback will come into onResponse(). If any error in the request the callback will go into onFailure(). In onResponse(), we can get our response from the response body.
ApiInterface apiService = ApiClient.getClient().create(ApiInterface.class);
    Call<List<Movie>> call = apiService.getMovies();
    call.enqueue(new Callback<List<Movie>>() {
        @Override
        public void onResponse(Call<List<Movie>> call, Response<List<Movie>> response) {
        }

        @Override
        public void onFailure(Call<List<Movie>> call, Throwable t) {
            Log.d("TAG","Response = "+t.toString());
        }
    });
Now our data is received in onReceive(). We can use the data for our application purpose. In this example, I am using this retrofit data to set up in recyclerview.
6. Set Retrofit response data into the recyclerview
In this post, I am skipping the recyclerview setup details. I have explained recyclerview in detail.
Retrofit android example kotlin[step by step]
set the received response into recyclerview.
recyclerView = (RecyclerView)findViewById(R.id.recyclerview);
LinearLayoutManager layoutManager = new LinearLayoutManager(this);
recyclerView.setLayoutManager(layoutManager);
recyclerAdapter = new RecyclerAdapter(getApplicationContext(),movieList);
recyclerView.setAdapter(recyclerAdapter);
ApiInterface apiService = ApiClient.getClient().create(ApiInterface.class);
Call<List<Movie>> call = apiService.getMovies();
call.enqueue(new Callback<List<Movie>>() {
@Override
public void onResponse(Call<List<Movie>> call, Response<List<Movie>> response) {
movieList = response.body();
Log.d("TAG","Response = "+movieList);
recyclerAdapter.setMovieList(movieList);
}
@Override
public void onFailure(Call<List<Movie>> call, Throwable t) {
Log.d("TAG","Response = "+t.toString());
}
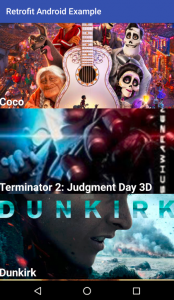
});That’s with the coding part. final output,
Screenshot
Download this retrofit android example in Java.
Download this retrofit android example in kotlin
Conclusion
Thanks for reading this post. This is a very basic example of retrofit android. You can try this retrofit android example and let me know your feedback in the comments.
Leave a Reply