View binding is the current recommendation from the Google team for importing the views from XML to Activity, Fragment, or Adapter classes. View binding is a feature that allows us to write code that interacts with views. In most cases, view binding replaces findViewById. It supports both Java and Kotlin.
To learn more about view binding check out the official documentation.
Main advantages
The new ViewBinding feature has some advantages compared to the traditional approach and some of the libraries:
- Null safety: view binding creates direct references to views, there’s no risk of a
NullPointerExceptiondue to an invalid view ID. Also, when a view only exists regarding some conditions, the field containing its reference in the binding class is marked with @Nullable. - Type safety: All the View binding fields are generated matching the same type as the ones referenced in XML, so there’s no need to typecast. This means that the risk of a class cast exception is much lower since If for some reason your layout and code don’t match, the build will fail at compile time instead of at runtime.
- Speed: it doesn’t have any build time speed impact since it does not use annotation processors like ButterKnife or DataBinding.
Before getting started, check out another post on the jetpack,
Android ConstraintLayout Example
Dependency injection on Android with Hilt[Example]
Getting started with WorkManager [Example]
Room Database Android Example [Beginners]
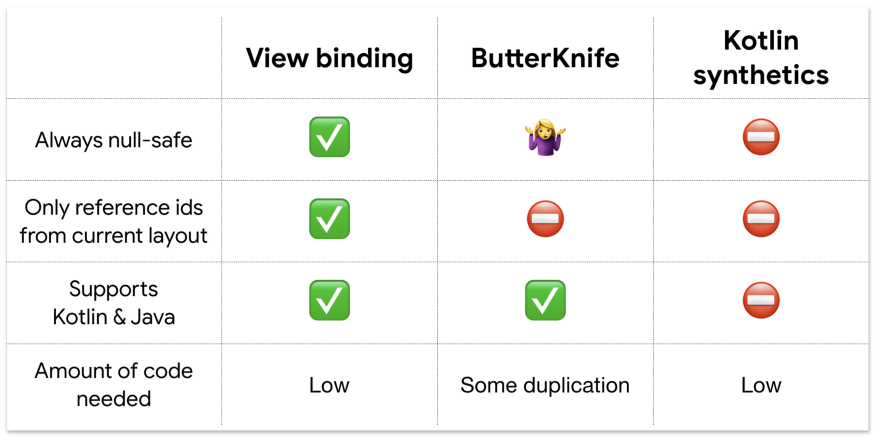
View binding and Kotlin synthetics or ButterKnife
One of the most common questions asked about view binding is, “Should I use view binding instead of Kotlin synthetics or ButterKnife?” Both of these libraries are used successfully by many apps and solve the same problem.
For most apps, we recommend trying out view binding instead of these libraries because view binding provides a safer, more concise view lookup.
Setup View Binding
To enable view binding in a module, set the viewBinding build option to true in the module-level build.gradle file.
android {
        ...
        buildFeatures {
            viewBinding true
        }
    }
Usage
Once enabled for a project, view binding will generate a binding class for all of your layouts automatically. You don’t have to make changes to your XML — it’ll automatically work with your existing layouts.
You can use the binding class whenever you inflate layouts such as Fragment, Activity, or even a RecyclerView Adapter (or ViewHolder).
For example, given a layout file called activity_main.xml:
<?xml version="1.0" encoding="utf-8"?>
<androidx.constraintlayout.widget.ConstraintLayout xmlns:android="http://schemas.android.com/apk/res/android"
                                                   xmlns:app="http://schemas.android.com/apk/res-auto"
                                                   xmlns:tools="http://schemas.android.com/tools"
                                                   android:id="@+id/container"
                                                   android:layout_width="match_parent"
                                                   android:layout_height="match_parent"
                                                   tools:context=".MainActivity">
    <TextView
            android:id="@+id/textAppName"
            android:layout_width="wrap_content"
            android:layout_height="wrap_content"
            android:text="Activity View Binding"
            app:layout_constraintBottom_toBottomOf="parent"
            app:layout_constraintLeft_toLeftOf="parent"
            app:layout_constraintRight_toRightOf="parent"
            app:layout_constraintTop_toTopOf="parent" />
    <Button
            android:id="@+id/buttonGotoFragment"
            android:layout_width="wrap_content"
            android:layout_height="wrap_content"
            android:layout_marginTop="8dp"
            android:text="Open Fragment"
            app:layout_constraintEnd_toEndOf="parent"
            app:layout_constraintStart_toStartOf="parent"
            app:layout_constraintTop_toBottomOf="@+id/textAppName" />

</androidx.constraintlayout.widget.ConstraintLayout>
The generated binding class is called ActivityMainBinding. This class has two fields: a TextView called textAppNameand a Button called buttonGotoFragment.
Every binding class also includes a getRoot() method, providing a direct reference for the root view of the corresponding layout file. In this example, the getRoot() method in the ResultProfileBinding class returns the ConstraintLayout root view.
Use view binding in activities
To use View Binding in Activity, create an instance of the binding class, get the root view, and pass it to setContentView().
class MainActivity : AppCompatActivity() {
        lateinit var binding: ActivityMainBinding
        override fun onCreate(savedInstanceState: Bundle?) {
            super.onCreate(savedInstanceState)
            binding = ActivityMainBinding.inflate(layoutInflater)
            setContentView(binding.root)
            binding.buttonGotoFragment.setOnClickListener {

            }
        }
    }
You can now use the instance of the binding class to reference any of the views:
binding.textAppName.text = "Hello"
    binding.buttonGotoFragment.setOnClickListener {

    }
Use view binding in fragments
In the onCreateView method, inflate your layout file and create the binding instance:
class MainFragment : Fragment() {
        lateinit var binding: FragmentMainBinding
        override fun onCreateView(inflater: LayoutInflater, container: ViewGroup?, savedInstanceState: Bundle?): View? {
            binding = FragmentMainBinding.inflate(inflater, container, false)
            return binding.root
        }
same to activity binding you can use the instance of the binding class to reference any of the views.
Disabling View Binding
If for any reason you want to disable View Binding on a specific layout, you can open it up and add the following statement.
<LinearLayout
      ...
      tools:viewBindingIgnore="true" >
      ...
    </LinearLayout>
Migrate from Kotlin synthetics to Jetpack view binding
Kotlin Android Extensions is deprecated, which means that using Kotlin synthetics for view binding is no longer supported. If your app uses Kotlin synthetics for view binding, use this guide to migrate to Jetpack view binding.
Update the Gradle file
Jetpack view binding is enabled on a module-by-module basis. For each module that uses view binding, set the viewBinding build option to true in the module-level build.gradle file:
android {
        ...
        buildFeatures {
            viewBinding true
        }
    }
Also, remove the line that enables Kotlin Android Extensions:
apply plugin: `kotlin-android-extensions`Now you can use the above-mentioned options to work with activity and fragments.
Migrating From findViewById
- remove all the findViewById() .
 lateinit var textView: TextView
lateinit var button: Button- add the binding class for your XML layout.
lateinit var binding: FragmentMainBinding- Now, replace
setContentView()with the following:
binding = ActivityMainBinding.inflate(layoutInflater)setContentView(binding.root)Replace textView with binding.textView. Then add the binding. prefix to the rest of the views marked in red by the IDE.
Thanks for reading. You can download the Android view binding example in GITHUB.
If you have any questions, please feel free to leave a comment below.
Leave a Reply