You might already know, We use RecyclerView to display a list of data in our application. In this post, I am explaining how to make recyclerview expandable.
That means We can show the list of headers first in the recyclerview. Once the user selects the particular header item, the recyclerview will expand and show its child items.
Before starting, We need a basic understanding of Recyclerview. If you are already familiar with recyclerview, Please continue to the below, otherwise, check this link.
Recyclerview Android Example [Beginners] – Howtodoandroid
Also, I am using Cardview for the expandable recyclerview Child and header items. check that also in the below link.
Cardview with Recyclerview Android Example [beginners] (howtodoandroid.com)
Now, We are ready to create an expandable recyclerview in android.
Steps To Create Expandable Recyclerview
- Adding Dependencies
- Prepare data for the recyclerview
- Design Header & child items layout for expandable recyclerview
- set data into expandable recyclerview
1. Adding dependencies
In this example, I am using Mindorks Placeholder library to create an Expandable Recyclerview for android.
It is built on top of Recyclerview and abstracts most of the boilerplate.It provides APIs through annotations.
implementation 'com.mindorks:placeholderview:0.7.1'As mentioned above, Add Retrofit And Recyclerview, and Cardview dependencies into the app build.gradle file.
implementation "androidx.cardview:cardview:1.0.0"
    implementation "androidx.recyclerview:recyclerview:1.1.0"
    //Retrofit
    implementation 'com.squareup.retrofit2:retrofit:2.3.0'
    implementation 'com.squareup.retrofit2:converter-gson:2.3.0'
    //Glide
    implementation 'com.github.bumptech.glide:glide:4.6.1'
In dependencies, I have added retrofit and glide to fetch data from the REST APIs and load images from the URL. I will explain the respective steps below.
2. Prepare data for the recyclerview
The next, step is to prepare data for the expandable recyclerview.
In this example, I am using the Retrofit library to fetch data from the REST API.
Retrofit is a REST Client library (Helper Library) used in Android and Java to create an HTTP request and also to process the HTTP response from a REST API. Since, It’s created by Square, you can also use retrofit to receive data structures other than JSON. For example, Simple XML and Jackson.
Check this post to set up retrofit in your application.
Retrofit Android Example With Recyclerview – Howtodoandroid
I am using https://www.howtodoandroid.com/movielist.json URL to fetch a list of movies with categories.
Response for the API call.
[{
            "category": "Latest",
            "imageUrl": "http://velmm.com/images/bottom_navigationview/coco.jpg",
            "name": "Coco",
            "desc": "Coco is a 2017 American 3D computer-animated musical fantasy adventure film produced by Pixar"
        },
        {
            "category": "Latest",
            "imageUrl": "http://velmm.com/images/bottom_navigationview/terminator_2.jpg",
            "name": "Terminator 2: Judgment Day 3D",
            "desc": "Similar to Cameron's Titanic 3D, Lightstorm Entertainment oversaw the work on the 3D version of Terminator 2, which took nearly a year to finish."
        },
        {
            "category": "Latest",
            "imageUrl": "http://velmm.com/images/bottom_navigationview/dunkirk.jpg",
            "name": "Dunkirk",
            "desc": "Dunkirk is a 2017 war film written, directed, and co-produced by Christopher Nolan that depicts the Dunkirk evacuation of World War II. "
        },
        {
            "category": "Favorites",
            "imageUrl": "http://velmm.com/images/bottom_navigationview/the_salesman.jpg",
            "name": "The Salesman",
            "desc": "The Salesman is a 2016 drama film written and directed by Asghar Farhadi and starring Taraneh Alidoosti and Shahab Hosseini. "
        },
        {
            "category": "Favorites",
            "imageUrl": "http://velmm.com/images/bottom_navigationview/lion.png",
            "name": "Lion",
            "desc": "Lion is a 2016 Australian biographical drama film directed by Garth Davis (in his feature debut) and written by Luke Davies, based on the non-fiction book A Long Way Home by Saroo Brierley."
        },
        {
            "category": "High Rated",
            "imageUrl": "http://velmm.com/images/bottom_navigationview/star_war.jpg",
            "name": "Star Wars: The Last Jedi",
            "desc": "Star Wars: The Last Jedi (also known as Star Wars: Episode VIII – The Last Jedi) is a 2017 American epic space opera film written and directed by Rian Johnson."
        },
        {
            "category": "High Rated",
            "imageUrl": "http://velmm.com/images/bottom_navigationview/thor_ragnarok.jpg",
            "name": "Thor: Ragnarok",
            "desc": "Thor: Ragnarok is a 2017 American superhero film based on the Marvel Comics character Thor, produced by Marvel Studios and distributed by Walt Disney Studios Motion Pictures."
        },
        {
            "category": "High Rated",
            "imageUrl": "http://velmm.com/images/bottom_navigationview/blade_runner_2049.jpg",
            "name": "Blade Runner 2049",
            "desc": "Blade Runner 2049 is a 2017 American science fiction film directed by Denis Villeneuve and written by Hampton Fancher and Michael Green. "
        },
        {
            "category": "High Rated",
            "imageUrl": "http://velmm.com/images/bottom_navigationview/borg_mcenroe.jpg",
            "name": "Borg McEnroe",
            "desc": "Borg McEnroe also known as Borg vs McEnroe, is a 2017 internationally co-produced multi-language biographical sports drama film focusing on the famous rivalry between famous tennis players "
        },
        {
            "category": "High Rated",
            "imageUrl": "http://velmm.com/images/bottom_navigationview/wonder.jpg",
            "name": "Wonder",
            "desc": "Wonder is a 2017 American drama film directed by Stephen Chbosky and written by Jack Thorne , Steve Conrad and Stephen Chbosky based on the 2012 novel of the same name by R.J. Palacio."
        }
    ]
Let’s create a Model class to hold the data from the retrofit.
Movie.java
public class Movie {

      @SerializedName("name")
      private String name;
      @SerializedName("desc")
      private String desc;
      @SerializedName("imageUrl")
      private String imageUrl;
      @SerializedName("category")
      private String categoty;

      public Movie(String name, String desc, String imageUrl, String categoty) {
        this.name = name;
        this.desc = desc;
        this.imageUrl = imageUrl;
        this.categoty = categoty;
      }

      public String getName() {
        return name;
      }

      public void setName(String name) {
        this.name = name;
      }

      public String getDesc() {
        return desc;
      }

      public void setDesc(String desc) {
        this.desc = desc;
      }

      public String getImageUrl() {
        return imageUrl;
      }

      public void setImageUrl(String imageUrl) {
        this.imageUrl = imageUrl;
      }

      public String getCategoty() {
        return categoty;
      }

      public void setCategoty(String categoty) {
        this.categoty = categoty;
      }

      @Override
      public String toString() {
        return "Movie{" +
            "name='" + name + '\'' +
            ", desc='" + desc + '\'' +
            ", imageUrl='" + imageUrl + '\'' +
            ", categoty='" + categoty + '\'' +
            '}';
      }
    }
Also, create an interface for the API call.
ApiInterface.java
public interface ApiInterface {
      @GET("movielist.json")
      Call<List<Movie>> getAllMovies();
    }
3. Design Header & child items for expandable recyclerview
In this step, I am creating layouts for the expandable view header and child layouts.
header_layout.xml
<?xml version="1.0" encoding="utf-8"?>
    <androidx.cardview.widget.CardView xmlns:android="http://schemas.android.com/apk/res/android"
        xmlns:app="http://schemas.android.com/apk/res-auto"
        xmlns:tools="http://schemas.android.com/tools"
        android:layout_width="match_parent"
        android:layout_height="60dp"
        android:layout_margin="5dp"
        android:elevation="5dp"
        app:cardBackgroundColor="@color/colorPrimaryDark"
        app:cardCornerRadius="8dp">

        <TextView
            android:id="@+id/header_text"
            android:layout_width="match_parent"
            android:layout_height="match_parent"
            android:layout_gravity="center_vertical"
            android:gravity="center_vertical"
            android:padding="10dp"
            android:textAppearance="@style/TextAppearance.AppCompat.Large"
            android:textColor="@android:color/white"
            android:textStyle="bold"
            tools:text="@tools:sample/full_names" />

    </androidx.cardview.widget.CardView>
design for the header layout,

As I mentioned earlier, Placeholder Library provides APIs through annotations.
Let’s configure the header_layout with HeaderView using annotations.
HeaderView.java
@Parent
    @SingleTop
    @Layout(R.layout.header_layout)
    public class HeaderView {

        private static String TAG = "HeaderView";

        @View(R.id.header_text)
        TextView headerText;

        private Context mContext;
        private String mHeaderText;

        public HeaderView(Context context,String headerText) {
            this.mContext = context;
            this.mHeaderText = headerText;
        }

        @Resolve
        private void onResolve(){
            headerText.setText(mHeaderText);
        }

        @Expand
        private void onExpand(){
            Toast.makeText(mContext, "onExpand "+mHeaderText, Toast.LENGTH_SHORT).show();
        }

        @Collapse
        private void onCollapse(){
            Toast.makeText(mContext, "onCollapse "+mHeaderText, Toast.LENGTH_SHORT).show();
        }
    }
In HeaderView.java,
- In the PlaceHolderView a @Resolve implies the item view class object added to the list.
- A class is defined as a parent item view through
@Parentclass annotation. - A parent item view on expanding will collapse other parent item views when annotated with @SingleTop. If not provided with this annotation then all the parent items will remain in their expanded state irrespective of whether other parents expand or collapse.
- A parent gets a callback when it is expanded or collapsed through
@Expandand@Collapseannotations respectively. They can be used to handle state changes. For Example, we can change the indicator icon. - The views defined in the layout provided by
@Layoutcan be referenced in the item view class using@Viewannotations on the global variable.
Next, do the same for this child layout.
First, create child_layout.xml,
<?xml version="1.0" encoding="utf-8"?>
    <androidx.cardview.widget.CardView xmlns:android="http://schemas.android.com/apk/res/android"
      xmlns:card_view="http://schemas.android.com/apk/res-auto"
      xmlns:tools="http://schemas.android.com/tools"
      xmlns:app="http://schemas.android.com/apk/res-auto"
      android:id="@+id/card_view"
      android:layout_width="match_parent"
      android:layout_height="wrap_content"
      android:padding="5dp"
        android:elevation="5dp"
      app:cardBackgroundColor="@color/colorPrimary"
      android:layout_marginLeft="20dp"
      android:layout_marginTop="5dp"
      android:layout_marginBottom="5dp"
      android:layout_marginRight="5dp"
      card_view:cardCornerRadius="10dp">

        <androidx.constraintlayout.widget.ConstraintLayout
          android:layout_width="match_parent"
          android:layout_height="wrap_content">

            <ImageView
                android:id="@+id/child_image"
                android:layout_width="70dp"
                android:layout_height="70dp"
                android:scaleType="centerCrop"
                tools:src="@tools:sample/backgrounds/scenic"
                card_view:layout_constraintTop_toTopOf="parent"
                card_view:layout_constraintStart_toStartOf="parent"

                />

            <TextView
                android:id="@+id/child_name"
                android:layout_width="0dp"
                android:layout_height="wrap_content"
                android:layout_alignParentTop="true"
                android:layout_alignParentEnd="true"
                android:layout_marginStart="8dp"
                android:layout_marginEnd="8dp"
                android:textAppearance="?android:attr/textAppearanceMedium"
                android:textColor="@android:color/white"
                android:textStyle="bold"
                card_view:layout_constraintBottom_toBottomOf="@+id/child_image"
                card_view:layout_constraintEnd_toEndOf="parent"
                card_view:layout_constraintStart_toEndOf="@+id/child_image"
                card_view:layout_constraintTop_toTopOf="@+id/child_image"
                tools:text="@tools:sample/full_names" />

        </androidx.constraintlayout.widget.ConstraintLayout>
    </androidx.cardview.widget.CardView>
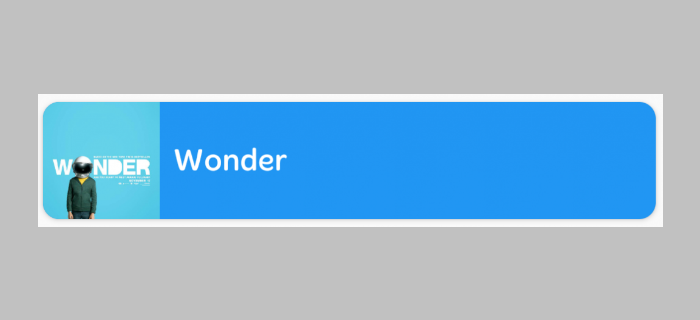
The child layout design looks like this,

Configure the child_layout in ChildView.java using annotations.
@Layout(R.layout.child_layout)
public class ChildView {
    private static String TAG ="ChildView";

    @View(R.id.child_name)
    TextView textViewChild;

    @View(R.id.child_image)
    ImageView childImage;

    private Context mContext;
    private Movie movie;

    public ChildView(Context mContext, Movie movie) {
        this.mContext = mContext;
        this.movie = movie;
    }

    @Resolve
    private void onResolve(){
        textViewChild.setText(movie.getName());
        Glide.with(mContext).load(movie.getImageUrl()).into(childImage);
        textViewChild.setOnClickListener(new android.view.View.OnClickListener() {
            @Override
            public void onClick(android.view.View v) {
                Toast.makeText(mContext, movie.getName(), Toast.LENGTH_SHORT).show();
            }
        });
    }
}
In ChildView.java, I am using Glide to load the images from the URL. I have explained Glide in detail in the below link.
Glide Library – Image Loading Library For Android (howtodoandroid.com)
4. set data into expandable recyclerview
Already, we have done the setup for data and header, and child view. Now. It’s time to set up an expandable recyclerview.
First, we need to create a layout file for the expandable view.
activity_main.xml
<?xml version="1.0" encoding="utf-8"?>
    <LinearLayout xmlns:android="http://schemas.android.com/apk/res/android"
        xmlns:tools="http://schemas.android.com/tools"
        android:layout_width="match_parent"
        android:layout_height="match_parent"
        tools:context="com.example.velmurugan.expandablerecyclerviewexample.MainActivity">

        <com.mindorks.placeholderview.ExpandablePlaceHolderView
            android:id="@+id/expandablePlaceHolder"
            android:layout_width="match_parent"
            android:layout_height="match_parent">
        </com.mindorks.placeholderview.ExpandablePlaceHolderView>

    </LinearLayout>
Finally, set the data into expandablePlaceHolder. In my example, I am getting List<Movie> with categories from the retrofit REST API.
So, I am putting all the categories into the header view and movies for the particular categories into the child view.
Adding header into recyclerview,
expandablePlaceHolderView.addView(new HeaderView(this, "header"));Adding child layout into recyclerview,
expandablePlaceHolderView.addView(new ChildView(this, movie));In my case, I am using the below method to add a header and child to the expandable recyclerview.
private void getHeaderAndChild(List<Movie> movieList){

          for (Movie movie : movieList ){
            List<Movie> movieList1 = categoryMap.get(movie.getCategoty());
            if(movieList1 == null){
              movieList1 = new ArrayList<>();
            }
            movieList1.add(movie);
            categoryMap.put(movie.getCategoty(),movieList1);
          }

          Log.d("Map",categoryMap.toString());
          Iterator it = categoryMap.entrySet().iterator();
          while (it.hasNext()) {
            Map.Entry pair = (Map.Entry)it.next();
            Log.d("Key", pair.getKey().toString());
            expandablePlaceHolderView.addView(new HeaderView(this, pair.getKey().toString()));
            List<Movie> movieList1 = (List<Movie>) pair.getValue();
            for (Movie movie : movieList1){
              expandablePlaceHolderView.addView(new ChildView(this, movie));
            }
            it.remove();
          }
        }
Expand Programmatically
A parent can be expanded programmatically by using either its instance or position.
try {
            expandableView.expand(parentItemView);
    } catch (Resources.NotFoundException e) {
            e.printStackTrace();
    }

    or

    try {
            expandableView.expand(2);
    } catch (Resources.NotFoundException e) {
            e.printStackTrace();
    }
Collapse Programmatically
A parent can collapse programmatically by using either its instance or position.
try {
            expandableView.collapse(parentItemView);
    } catch (Resources.NotFoundException e) {
            e.printStackTrace();
    }

    or

    try {
            expandableView.collapse(2);
    } catch (Resources.NotFoundException e) {
            e.printStackTrace();
    }
Collapse all the parents
expandableView.collapseAll();That’s it. we are done with the expandable recyclerview android example.
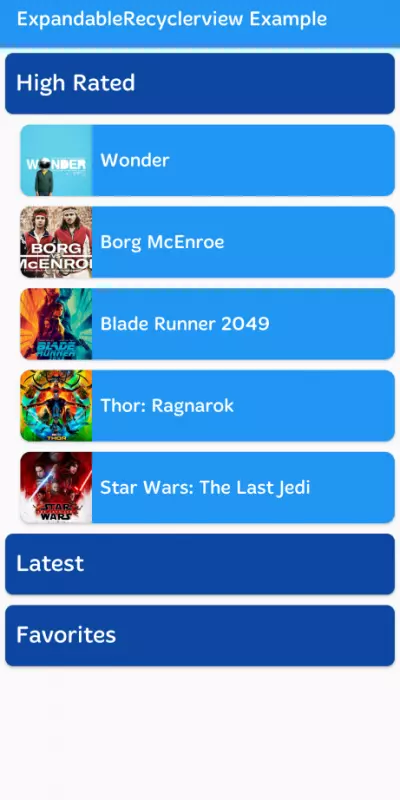
Screenshot

Download the expandable recyclerview example on Github.
Conclusion
Thanks for reading this post. In this example, I am using the PlaceHolder Library. There are a lot of libraries available for the same example. Please try this and let me know your feedback in the comments section.

Leave a Reply